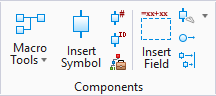
Insert Field
 Lets the user assign a field as
an area of the schematic to contain remote devices
Lets the user assign a field as
an area of the schematic to contain remote devices
Overview
Promis.e is an intelligent software package that can identify locations as well as logical connections. However, in the two-dimensional schematic world, the user must provide the software with the means to distinguish between real-world, physical locations and theoretical callouts on the drawing.
To allow the software to recognize remote devices, the user can assign a field as an area of the schematic to contain the remote devices. A different Installation and Location can then be assigned to the field.
Promis.e will associate the devices in the field with this new Installation and Location rather than the Installation and Location of the page where the field appears.
A field can be drawn around existing devices, or devices can be drawn inside an existing field.
A field can be drawn within another field, but it must be completely inside the other field.
Insert Field
Select the option and use the mouse to locate the opposite corners of the field defining the boundary. In the command prompt you are prompted to Locate the text position. Select a point near the field where the field's Installation/Location name will be printed. The Field Parameters dialog will appear:

| Setting | Description |
|---|---|
| Installation/Location | At the top of this dialog box you can enter the Installation and/or Location name to which you wish the field to be assigned. This can be an existing installation/location, or one that has not yet been used. (The field can have the same installation name as the drawing page where it appears, but it should have a different location name if the field is to indicate remote devices.) Use the drop-down list to display the names of existing installations and locations. |
| Rename existing symbols... | The Rename Existing Symbols to Inst/Loc of the Field check box determines whether or not any existing symbols in the field area will be renamed (reassigned) to the field's installation and location. When the check box is on, existing symbols are renamed. |
| Text Settings |
The fields in the bottom of the dialog allow you to define the characteristics of the text that will label the field on the drawing. The Text-Offset values indicate the distance from the field insertion point (first corner) to the insertion point (write position) of the text. These values can be altered if desired. The Line Color and Line Type fields allow the characteristics of the field border line to be set. Drop-down buttons are available on the right side of each field for displaying and selecting most of these text and line parameters. |
Mixed Device Assignment
- Before creating the field, draw the devices that are to remain local.
- Draw the field around the local devices. During the field creation process, set the Rename existing symbols to inst/loc to name of the field check box to off (no checkmark). This will cause the symbols to remain associated with the Installation/Location of the current page.
- Add the remote devices to
the field area. Any new devices will be assigned to the Installation/Location
of the field.
Note: The logic functions of Promis.e ordinarily do not allow two devices with the same name to be assigned to the same Installation/Location. However, you may wish the devices in a field to represent devices that exist on another page, and therefore you would give the field the same Installation name as the other page where the devices appear.
As shown in the following illustration, the device PB123 appears in Installation A, Location B as a local device and also as a remote device in Installation X, Location Y. The remote field has been assigned to Installation A, Location B.
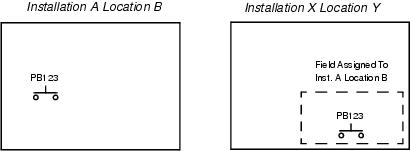
Ordinarily, when the device ID PB123 was entered a second time for the same Installation/Location, a "Device already exists" error would be displayed and the ID would not be allowed.
This restriction can be overridden by selecting the Duplicate Device ID check box in the Device Properties dialog when both symbols are placed. Therefore in the example above, the ID PB123 would be assigned to both pushbuttons when they are placed (or after they have been placed by right clicking on the device ID and changing it).